Showing posts with label gluten free. Show all posts

Tuesday, 7 July 2015

Gluten Free Apple Crumble

I've just had one of those moments where I needed dessert. Perhaps it was because dinner was a little while ago or because I was watching someone cook dessert on Masterchef. Whatever it was I had a desire that needed to be fulfilled. Given that I'm gluten and lactose intolerant and on a clean eating path there's no processed goodies in my house. I've refused to buy I cream ever since I realised how many chemicals were in it and I haven't quite got around to making the raw ice cream I've been dreaming of. So what was tonight's answer?

Today I stocked up on fresh produce and there are plenty of apples in the house for juicing so I decided to create my food intolerant version of Apple Crumble with an Almond Milk Custard. Given the time and the fact I was using Apple I went easy on the sugar side. Not much was needed anyway with the sweetness of the apple. The crumble was created with flax meal, chopped pistachio and almond. I also added some craisins that were in the pantry to add a variation in flavour. Once constructed it was drizzled with honey before baking in the oven for 15 mins. 


I made this dessert for one person so if you are making it for more people you'll need to adjust your quantities accordingly. It's also easier if you make it in a rammekin or small dish

Here's the recipe

Apple Crumble

1 apple per person 
2 tablespoons flax meal
8 almonds 
8 pistachio
1 tablespoons craisins
1 tablespoon honey

Chop the Apple and place into a rammekin. Sprinkle craisins over the Apple and then top it with the flax meal. Chop the almonds and pistachios and sprinkle over the top. Drizzle honey over the whole thing. Place into an oven heated to 180 degrees and bake for 15mins.

While the crumble is in the oven you can make the custard. It only takes 5 minutes so you can leave it until the crumble is almost cooked.

Almond Milk Custard

This recipe will easily serve 2. If you are cooking for one you can either indulge or save some for the next night

150grams almond milk
1 egg
10 grams unrefined cane sugar or coconut sugar. I used rapadura
10 grams gluten free cornflour
Vanilla

Place a saucepan on kitchen scales and measure 150grams almond milk. Add the egg and whisk well.  Add vanilla, sugar and cornflour and whisk well again. I normally whisk it til it foams a little. Place over a low heat and whisk until it starts to thicken. I like my custard to be thick but still runny so once it starts to thicken you don't need to continue with the heat for long. Remove from heat and whisk well to ensure a smooth conistency. 

Remove the crumble from the oven and allow to cool slightly. Because of the portion size you can serve it in the rammekin. Pour some custard over the top and enjoy


Monday, 8 June 2015

Saladspiration - the BIG Green Salad

I've been busy watching videos on FMTV and learning heaps. The other night I watched 'The Healing Effect' which focused on a policeman in the US and his vegan lifestyle and how he quietly influenced those around him. One scene featured him in a vegan restaurant where he ordered the "five o bowl", a huge colourful bowl of salad and nuts. It was with that image in mind that I opened my fridge and started creating my 'BIG Green Salad'


What's in it? you ask.... um kind of everything!

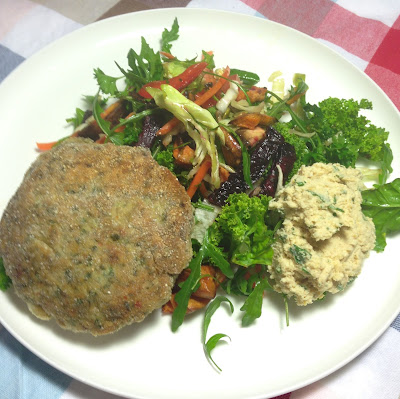
kale, baby spinach, lettuce, rocket, cabbage, parsley, coriander, broccoli, roasted sweet potato, swiss brown mushroom, tomato, carrot, red capsicum, pepitas, toasted sunflower seeds and quinoa. All tossed around in a splash of garlic oil.

I served it with some marinated pan fried organic tofu and homemade hummus. 


The salad was super tasty and has kept me nourished for a couple of meals. I have to admit that I'm a little addicted to hummus at the moment. I recently found a note book where I'd written the hummus recipe from Mollie Katzens  'Moosewood Cookbook' we'd bought as a present for our mum in the 1980"s.  Back then both my sister and I were vegatarian, and already interested in raw food and juicing. After 12 years of being vegetarian I returned to eating meat in the late 90's.

Tonight I added roasted beetroot to the salad and served it with a Free Range Chicken Burger created from a recipe on the 'I Quit Sugar' blog which I adapted slightly.


Friday, 3 April 2015

Marinated Prawn Gnocchi

If you've read my earlier posts you may have come to the conclusion that I like to cook. Actually I love to cook, if I could spend everyday playing in the kitchen I'd be a very happy girl.

Yesterday was shopping day and I bought some prawn meat and decided to marinate it overnight in a mix of garlic, chilli and olive oil.  When I got home this afternoon a quick scan of the fridge and the presence a tub of light ricotta on the top shelf helped me decide that it was a gnocchi night. I make my gnocchi with gluten free flour so its very light and as it turned out was the perfect accompaniment to my prawns. 

I love making gnocchi, whether it be potato or ricotta based. The trick is to not make the dough too dry. Prior to discovering I was gluten intolerant I made gnocchi a few times with normal flour and I have found that it's not only easier to make with gluten free flour but also gives a lighter result.


I found my gnocchi recipe on the internet and then adapted it to be gluten free.

500gm Ricotta
2/3 cup grated Parmesan
2 large Eggs 
1tsp Salt
1 1/2 cups Plain Gluten Free Flour  (plus 1 cup extra just in case)

Put all ingredients except flour in a bowl and mix until well combined. Then gradually sift in flour until it reaches a workable consistency. It needs to be rolled into a snake to create the individual gnocchi so the consistency should be soft but not so damp that it's really sticky. Flour a board or a piece of baking paper and divide into 4. Take each section and roll into a snake until it's about 2cm in diameter then cut into segments that are 2.5 cm long. Place onto a plate or a piece of baking paper and keep each individual piece separate. Continue until all of the dough is used up. This recipe serves 4 so if you are only serving 2 you can use half the amounts to begin with or you can wrap up half the dough and store in the fridge over night. Another option is to freeze any excess gnocchi once cut, if you are storing it in a freezer bag remember to flour it well so that it doesn't all clump together in the freezer

At this stage I put a large pot of water on the stove and put the gnocchi aside while I started my prawns.


There's no real recipe for the next bit because I made it up as I went along. It helped that I'd been shopping yesterday as the vegetable crisper was full and I had heaps to choose from. And as an added bonus there are still plenty of fresh herbs in the garden. In a deep non stick fry pan I put in a tablespoon of garlic oil* a small bunch of chopped spring onions and some garlic chives, and cooked them on a low to medium heat. After a few minutes I added a handful of broccoli florets and some yellow capsicum and let that cook for a few minutes. 

Next I put my gnocchi into the boiling water. Gnocchi is cooked when it floats to the surface. While the gnocchi was cooking I put my marinated prawns in the fry pan and turned the heat up little. 

After a couple of minutes the Gnocchi was floating and I removed it from the pot with a slotted spoon, when the prawns were mostly cooked I threw in the gnocchi and added some fresh chopped coriander and a twist of lime.

As soon as the prawns were cooked it was ready to serve, with a pinch of Himalayan salt and some more chopped coriander. 

 Yum!


*garlic oil - where did I get it? I made it. I have a jar of peeled garlic in the pantry it's topped up with olive oil to keep the garlic from spoiling. It has several benefits, when I can't be bothered peeling garlic there's always some ready to use. I can stock up on garlic when I find good Aussie garlic at a reasonable price and not have to worry about it drying out. And it gives me the most amazing garlic infused oil to cook with.


Sunday, 22 March 2015

In the Raw and a little Fermented!

I've been more than a little fascinated with the benefits of fermented foods for quite some time now. There have been a few attempts at making sauerkraut in the last year but the results have usually ended up being consumed by my best friend. But in recent months the whole fermenting fascination has been rekindled by chef Pete Evens 'Paleo Way'. I eagerly awaited the release of his culture for life fermenting kit only to find that it was a little out of my price bracket. So I decided to order some vegetable starter culture online at healyourself.com.au and go back to the good old fashioned way of fermenting in air lock preserving jars. 2 days after I received shipping notification for the starter culture an email appeared in my inbox from The Raw Chef, Russell James, offering the fermented vegetable module of his online Fermentation course at a ridiculous price... so I snapped it up.

The particular course I purchased offered 10 recipes plus access to a bonus 4. They include not only a downloadable pdf version of each recipe but also a video showing either Russell or his colleague Amy demonstrating how to make each one. The trick to creating fermented vegetables that don't grow mold is all in how you pack it into the jar! So simple yet so easy to mess up. Fortunately in my previous adventures I managed to create without mold but didn't have the confidence to eat it hence my best friend being my guinea pig. 

My first attempts in the last week were using Himalayan salt on it's own as a catalyst to ferment then later in the week after my starter culture arrived I started using that. The advantage of the starter culture is that it creates a ferment with a much higher pro biotic content than you would get using salt alone.

Here's some of what I've made so far. It's still all in the fermentation stage but I have sampled and it's already delish and  that's coming from someone whose taste buds previously found sauerkraut to be totally undesirable


The other thing that's happened as a result of this is that I've also rekindled my love of raw food eating and have taken the dehydrator out of the cupboard and started creating again. The Raw Chef has recipes on his blog and I've taken a few of these and run with them. So far this week I've created zucchini tortillas, buckwheat bread, marinated mushrooms, dried tomatoes, cashew mayonnaise and raw macadamia cheese.


Top left: zucchini wrap ready to dehydrate. Top right: assembling the wrap with grated
carrot, lettuce, marinted adn dehydrated mushrooms, macadamia cheese, dried tomatoes 
and cashew cheese. Bottom left and right:all wrapped up and ready to eat 

I'm still eating cooked foods but this has been reduced and I have to say I'm feeling better for it. I'd started eating more processed foods again and as a result my sugar cravings had come back. In the last week I've noticed a distinct decline in my sugar cravings. I'm hoping these will go completely once I start eating the fermented veg and krauts

If you want to experiment yourself and need a little inspiration or guidance the Raw Chef offers a free 10 Recipe eBook, there's a link in the side bar.


Saturday, 18 January 2014

Gluten Free Tuna Piadina


Earlier this week I found Jamie Oliver's "Save with Jamie" on sale in a local shop. I'd watched a few episodes of the TV series and the book was a must have. Tonight I attempted my favourite recipe from the episodes I watched, Jamie's Tuna Melt Piadina, but with a few variations. 

A Piadina is a toasted flat bread, and being gluten intolerant I thought I'd give it a crack with some gluten free self raising flour and I made a few adjustments to the filling according to my taste.

The Piadina is basically self raising flour and water. Next time I'd be inclined to add a little oil as the gluten free flour made it a little dry.  Once combined the flour mix is kneaded and rolled into a ball then flattened to fit the base of an 18cm non stick fry pan. It's cooked for several minutes on both sides until puffy and golden brown. Once cooked its sliced thru the middle to create 2 discs. 


This is the flat bread in the pan, sorry the photos a little blurred! 

For the filling I used tuna, cannellini beans, brown onion, cheddar, smooth feta, garlic chives and thyme. These were all mixed together in a bowl.


I put a light coating of organic Dijon mustard on one side of the flat bread before adding the tuna mix and putting the whole thing back in the pan until the cheese in the mix was melted. 

Served with a side salad of grape tomatoes and lettuce the only thing left to do was enjoy..... 

For Jamie Oliver's version of this you'll need to buy the cook book which is full of some amazingly simple but tasty recipes. 

Thanks for the inspiration Jamie.